

🐴 My 2 favourite vibe-coding techniques that help when prompts aren't enough
A guest post by Nimisha Patil


Today’s post is a guest post by Nimisha Patil. She’s an active member of our community and passionate about building AI products. I had a virtual coffee chat with her last year and was impressed by her resourcefulness and passion for building AI products.
In this article, she introduces ASCII wireframes and the Figma-to-code plugin as key parts of her “vibe coding” process.
Hope you find her insights helpful.
Like everyone else, I used to obsess over writing the perfect prompts for generating the perfect outputs with AI tools. But after months of building with AI, I’ve realised that the best results don’t only come from templated prompts. Process is super important as well.
Vibe-coding is my method for building with AI tools. It's less about technical precision. Instead, it's about finding the right flow between human creativity and AI capability.
Thus, I want to share the 2 techniques that have completely changed how I approach vibe-coding:
ASCII wireframes for layout discovery, and
Figma-to-Code for when I need pixel-perfect results
The Problem with Prompt-First Thinking
Most times, people are encouraged to approach AI design tools like briefing a designer: “Design a beautiful e-commerce site with the following features:…”
And this is usually good if you don’t want to start with a blank slate and iterate on the ideas suggested by the AI. But oftentimes, I’ve found that the outputs eat up a LOT of credits based on the complexity of the idea and the UI choices are generic white white websites with pink-purple gradient text in the hero section and an unimaginative website layout.
This is usually because we are asking the AI to do too many things at once. Layout structure, visual design, brand colors, and features all at once? That's a recipe for generic results.
Instead, I work in layers. Structure first, then visuals. And I've found two specific techniques that make this approach actually work.
Technique 1: ASCII Wireframes - My Layout Discovery Tool
I learnt about this approach through a Youtuber. Unfortunately, I can't remember which one to link here 🙈. But I will be forever grateful.
Let's use the example of a current marketplace project I'm working on. It's for B2B plywood sourcing for contractors. Instead of jumping straight into visual design, I started asking AI to generate ASCII wireframes (text-based layouts using simple characters) first.
Here’s the actual prompt I used in Claude (You could try your favourite AI assistant):
"Build ASCII wireframes for this user journey:
• Landing Page → User discovers platform via Google
• Search/Browse → Looking for products by location and delivery time
• Product Detail → Selection with custom sizing and vendor details
• Checkout → Payment options + delivery preferences
• Order Confirmation → Account creation + order summary
• Order Tracking → Vendor workflow progress"
This is what you’d expect as an output:
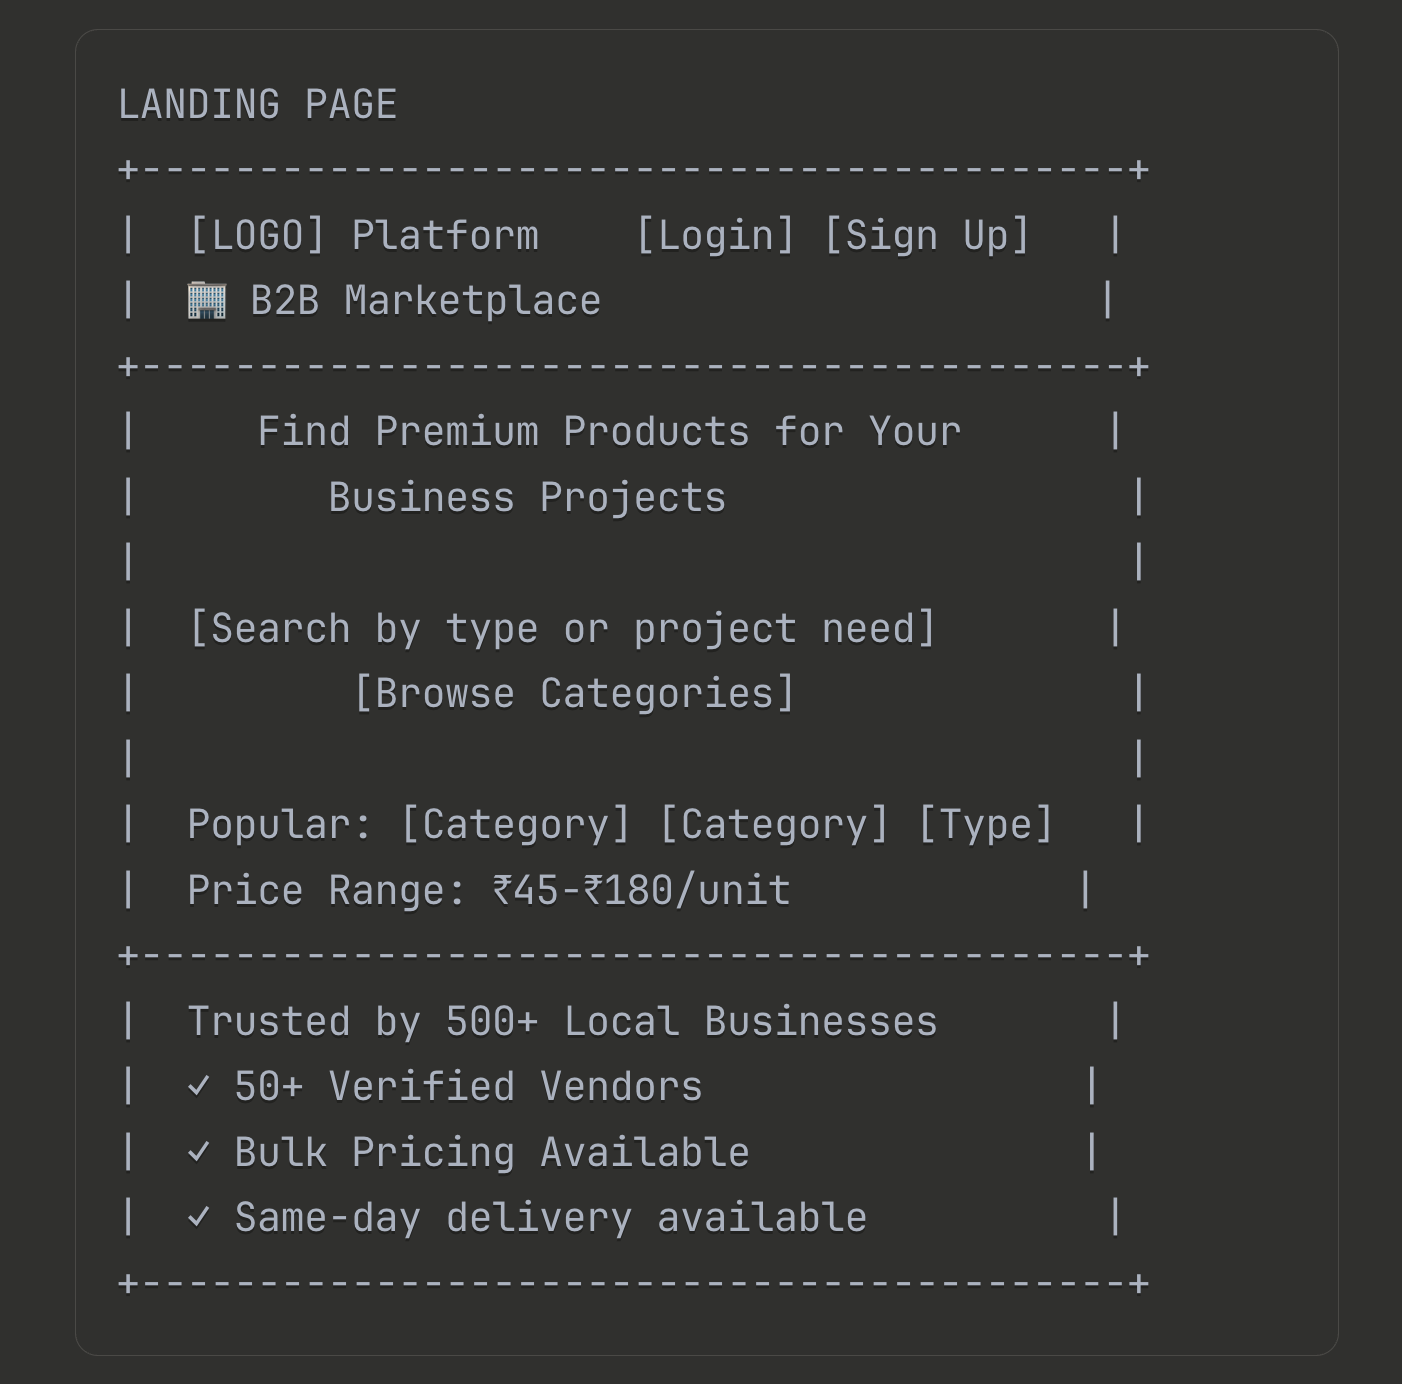
It’s not just the ASCII art that’s fascinating. It’s also that the AI is focused purely on structure & hierarchy without getting distracted by colours, fonts or visual styling. And without eating up too many tokens or credits.
Why ASCII Wireframes Work So Well
Lower Cognitive Load: The AI doesn't try to solve layout and visuals at the same time. It can focus on what information goes where.
Faster Iteration: I can say "move the price range higher" and get a new layout in seconds, not minutes.
Resource Efficient: Uses way fewer tokens/credits than visual generation.
After I get the ASCII wireframes, I do something that's become crucial to my process: I ask the AI to review its own work with a panel of experts.
My follow-up prompt: "Review these wireframes with a panel of UX, marketplace design, and local market experts. What would they improve?"
This often reveals critical insights I missed. For my marketplace project, the "expert review" pointed out missing trust signals, the need for bulk pricing indicators, and local market payment preferences I hadn't considered.
When ASCII Isn't Enough: Enter Figma-to-Code Plugin
ASCII wireframes are perfect for structure, but sometimes I have a specific visual vision that AI just can't capture through prompts alone. That's when I switch to what I call my "obsess over details" mode.
The philosophy is simple: make it functional first, then obsess over the details later. To be fully honest, I ONLY use this method these days when I am actually finalising the product before launch and want to make it look unique. This means I’ve validated the need and functionality and want to now make it beautiful.
My Visual Design Process
Step 1: Curated Inspiration
I gather references from Mobbin, Awwwards, SiteInspire, and Landingfolio. As someone who started as a graphic designer, I've learned there's no better way than to "steal like an artist" (seriously, everyone should read that book). I've only ever been able to design beautiful things by looking at other beautiful things.
Step 2: Reference Collection
I use the HTMLtoDesign plugin to save references directly into Figma, or just screenshot inspiration onto a FigJam board.
Step 3: Design Vision Creation
This is where I start designing in Figma. As I mentioned, I only get into this phase once I’ve tested the product a few times before. So I always have reference user flows as a starting point. So now, I can dive straight into the detailed UI work.
Step 4: Detailed Design
Some might think I go too detailed here, but I prefer having the complete vision sorted before execution. It doesn't mean I won't change things during implementation, but having a north star keeps me focused.
The Figma-to-Code Bridge
Step 5: Transfer to AI tool
Once I have my detailed Figma design, I screenshot the UI in Figma and upload it to my AI tool.
My typical prompt looks like this:
"I want to redesign this component completely. Please replicate this UI exactly. Ask me for any clarification or assets you need. [Screenshot attached]"
When I tried working with just the screenshots, the AI usually asks for logos, custom fonts, icons, and colour definitions. I upload these assets (I use Lovable currently but I'm exploring other tools), then go component by component.
Step 6: Component-by-Component Implementation
This is the most tedious part but also the most effective. Instead of asking the AI to redesign everything at once, I copy the Figma-to-Code output for individual components and ask the AI to integrate each one.
For example:
"Replace the current header component with this exact styling: [Figma-to-Code HTML/CSS]. Maintain all existing functionality but match this visual design exactly."For the ‘Post Viewer’ project, this is what the HTML code output from ‘Figma to Code’ for the hero section looked like:
<div data-layer="Frame 3049" class="Frame3049" style="width: 633px; flex-direction: column; justify-content: flex-start; align-items: flex-start; gap: 12px; display: inline-flex">

<div data-layer="Preview your posts before publishing" class="PreviewYourPostsBeforePublishing" style="align-self: stretch; color: #1954F7; font-size: 47px; font-family: Departure Mono; font-weight: 400; line-height: 56.40px; word-wrap: break-word">Preview your posts before publishing</div>

<div data-layer="Create compelling content with our intuitive editor and see exactly how it will appear on LinkedIn" class="CreateCompellingContentWithOurIntuitiveEditorAndSeeExactlyHowItWillAppearOnLinkedin" style="align-self: stretch; color: black; font-size: 18px; font-family: Crimson Text; font-weight: 400; line-height: 21.60px; word-wrap: break-word">Create compelling content with our intuitive editor and see exactly how it will appear on LinkedIn</div>

</div>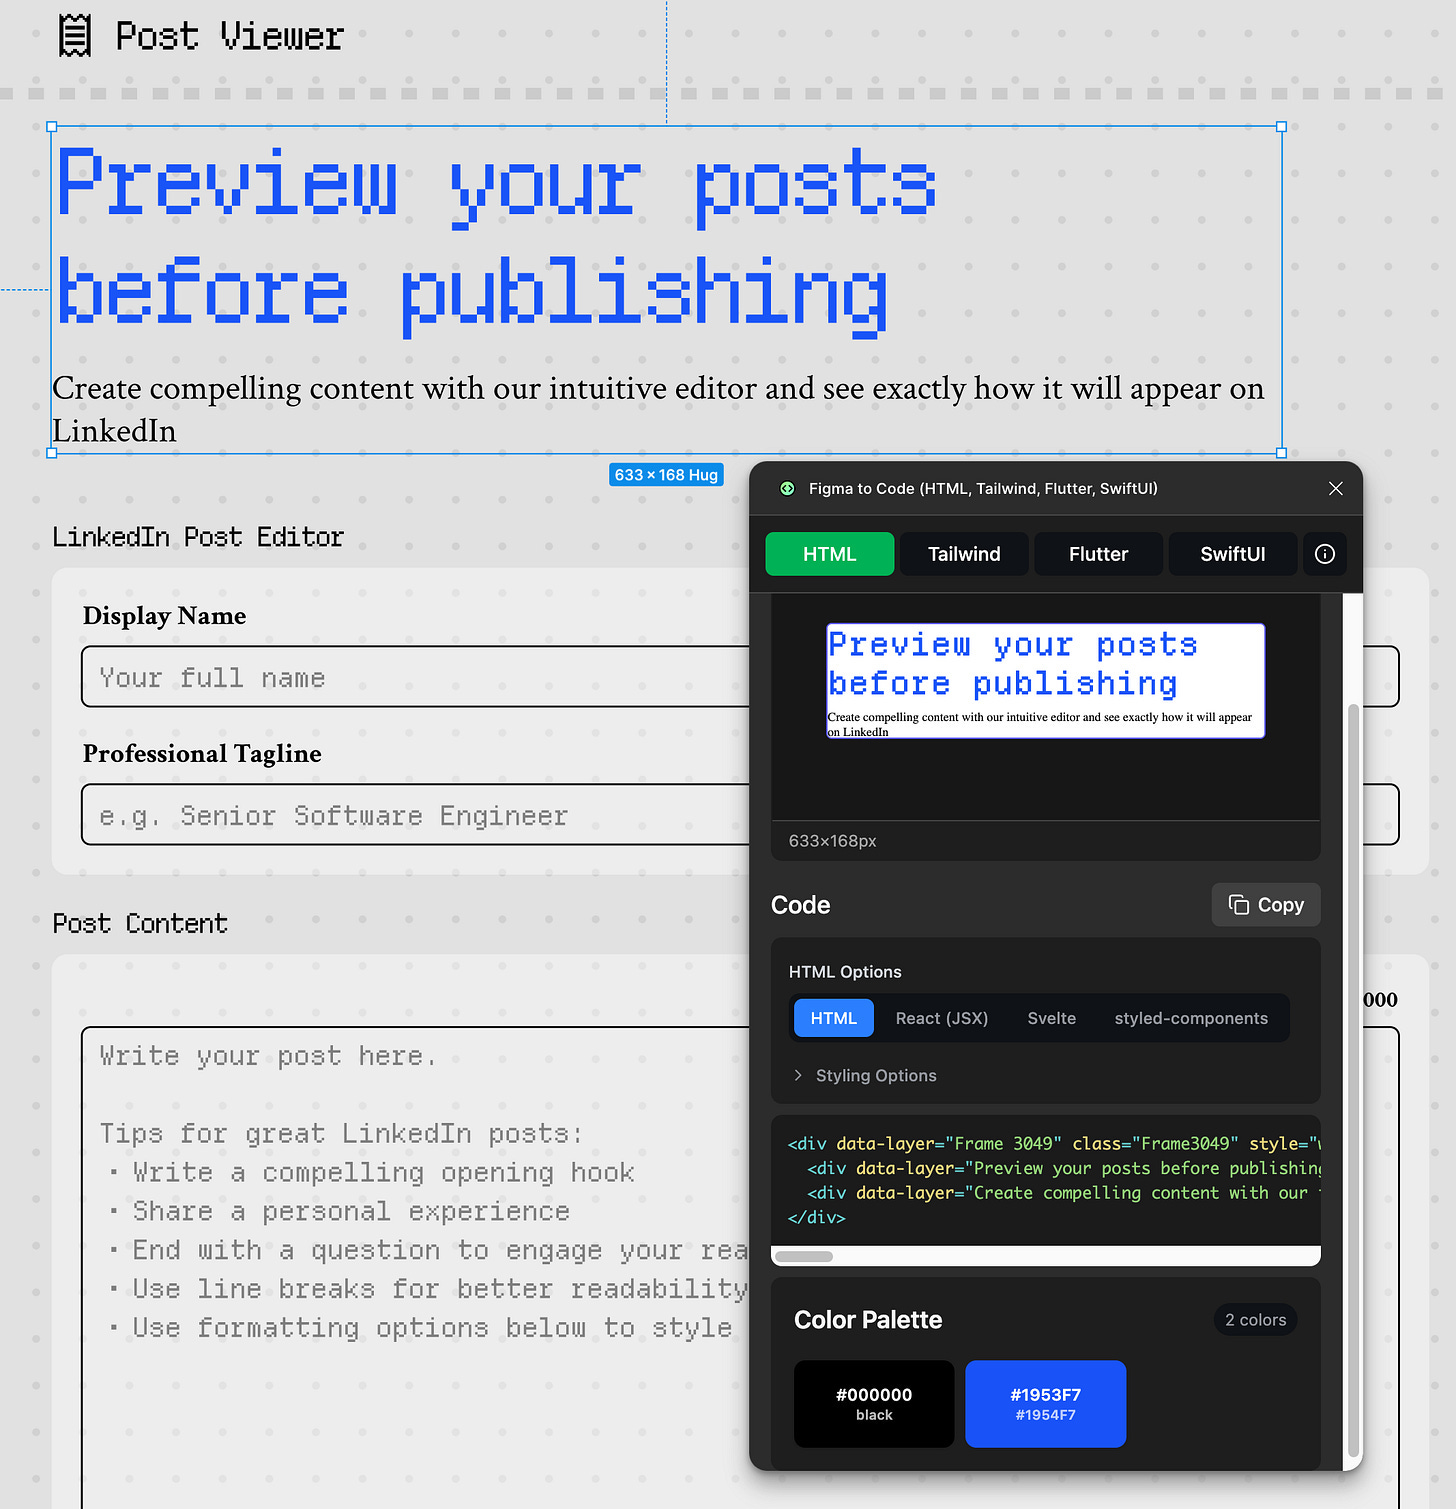
It does a good job in replicating the styling. But it also ends up hard-coding the changes which is not exactly a clean way of coding. Some developers might cringe at this 😅. I guess another way to do this would be to use the ‘styled-components’ tab in the Figma to Code Plugin. I might try it next time.
So far, I’ve just gone about with the hard-coded method. Someone who understands coding best practices can tell me if I’m better off using the options. Feedback welcome 😃.
For those wondering if one could also generate the code for the entire frame all at once and paste it into Lovable, yes, you could probably do that. Figma to Code allows this as well. All you need to do is select the Frame and it will give you the code. (see screenshot below)
Time for Pros and Cons
ASCII Wireframes:
✅ Lightning fast iteration
✅ Perfect for structure and flow
✅ Great communication tool
❌ Zero visual design
❌ Requires separate styling phase
Figma-to-Code:
✅ Pixel-perfect results
✅ Professional visual quality
✅ Design system consistency
❌ Time-intensive process
❌ Creates technical debt (messy code that works but isn't clean)
❌ Credit/token expensive (my last redesign ate 35 credits!)
Choosing Your Weapon
Here's my decision framework:
Use ASCII Wireframes when:
Starting a new project
Working with stakeholders who need to understand structure
Iterating on user flows
You have limited AI credits/tokens
Use Figma-to-Code when:
You have a specific visual vision
Generic AI outputs aren't good enough
You need to match an existing brand
You're willing to invest time for quality
The Resources That Actually Help
I don't maintain complex prompt libraries like some people suggest. Most of my prompts are just conversational requests to the AI. But I do keep a few key resources handy:
Inspiration sites: Mobbin, SiteInspire, Landingfolio for visual references
Figma plugins: HTMLtoDesign for quick reference capture, Figma-to-Code for extraction
Simple prompt templates: Saved in Apple Notes, nothing fancy
The real secret isn't having perfect prompts but knowing when to use which technique.
The Bigger Picture
Here's what I've realised: vibe-coding isn't just about replacing traditional design skills. It's about amplifying them. The ASCII wireframe technique forces better information architecture thinking. The Figma-to-Code process makes you more intentional about visual design decisions.
Most importantly, both techniques give you control over the AI instead of hoping for magic through better prompts.
The tools will keep evolving (I'm already exploring alternatives to my current setup), but these processes work regardless of which AI platform you're using. It’s about thinking in layers and knowing when to be strategic versus when to be tactical.
Try the ASCII wireframe approach on your next project. You might be surprised how much clearer your thinking becomes when you separate structure from style.
Intro about Nim:
Hey fellow product builders 👋, I’m Nim. An engineer turned designer, I’ve been designing B2B AI products for over 8 years now 😱. I left my fulltime job late last year to build my own design studio that specialises in designing exceptional AI experiences and helps product teams move from idea to real customers, faster using AI.
Over the last year I've had a lot more headspace to think about new ideas and brainstorm ways to make them real. But so many times, a lot of these ideas just languish in my notes app, never seeing the light of day because I don’t get a chance to spend time on each one. Last month, a friend and I were thinking about whether there was an opportunity here. So we’ve decided to collaborate on understanding how others record and engage with new ideas.
Would love to hear from the community if you relate to any of this. Get in touch if you’d like to hear more. We will launch something very soon.
You can find me on LinkedIn and learn more about Swirly Peak on our website. I also publish a newsletter every week here on Substack.
Thanks for sharing, Nim! It’s my first time hearing that Figma plugin. Curious how well it performs compared to other alternatives. I was also intrigued by the idea of ASCII wireframes—brilliant.
See you all next time,
Xinran
-
P.S. I also gave a talk, along with some demos, on “Vibe Designing with AI” last week. You can find the recording here.
 | A guest post by
|
Appreciate you Xinran. Thanks for the feature 🙏 😁
Agree, great guest post!